
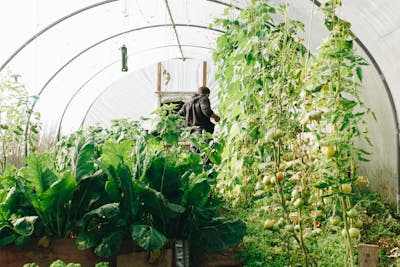
Building your own greenhouse at home can be very exciting and cost-effective to grow your own vegetables, flowers, and plants year-round. You don't necessarily need an expensive fancy greenhouse kit because it can be built using some basic materials and tools. It will serve all your gardening purposes and is of use. We will take you through the steps in making a homemade greenhouse.
1. Planning Your Greenhouse
The first steps are to determine how big you want your homemade greenhouse to be and where it will go. You want to find a sunny location for it and it must have good drainage. You must consider the plants you plan to grow for different plants need different light and space ranges. A seedling greenhouse is not necessarily as large as one meant for growing vegetables.
2. Materials You’ll Need
To make a simple and affordable greenhouse, gather the following materials:
- Wood or PVC pipes for the frame
- Plastic sheeting or polycarbonate panels for the covering
- Brackets, screws, or nails for assembly
- Door hinges for the greenhouse entrance
- Zip ties or rope (for securing the plastic covering)
- Basic tools (hammer, saw, drill, etc.)
3. Building the Frame
The frame of the greenhouse is basically just its skeleton, which can be constructed using wood or PVC pipes. While PVC is lighter and easier to assemble than wood, it's not considered to be durable enough when compared to wood. Here is how to build the frame:
- Measure and mark the area on which you want to lay out your greenhouse.
- Then use PVC pipes and wood beams to build the base or sides of the square or rectangular shape.
- Install additional vertical supports in all the corners and any other areas requiring additional support.
- At the very top of the roof, connect angled PVC pipes or wood beams to create an arch or slanting roof line which forms the roof.
4. Installing the Covering
The covering will protect your plants from the elements while letting sunlight through. Use plastic sheeting or polycarbonate panels to cover your greenhouse. Here’s how:
- Measure the length and width of each section of the frame.
- Cut the plastic sheeting or panels to fit each section.
- Secure the plastic sheeting using zip ties, rope, or fasteners, ensuring it’s tightly wrapped to prevent air leakage.
- For a sturdier option, polycarbonate panels can be screwed directly to the frame.
5. Building the Door
To access your greenhouse, you’ll need a simple door. You can build one using wood or PVC pipes covered with plastic sheeting. Here’s how to make a basic door:
- Cut two vertical and two horizontal pieces of wood or PVC to the size of the door opening.
- Connect them into a rectangular shape to form the door frame.
- Attach the plastic sheeting or panel to the door frame.
- Use door hinges to attach the door to the greenhouse frame, and install a latch to keep it closed.
6. Ventilation and Temperature Control
Proper ventilation is key to keeping your plants healthy inside the greenhouse. To provide ventilation:
- Leave a small gap between the roof and walls for air circulation.
- Install a small window or vent that can be opened and closed as needed.
- In warmer climates, you may need to add a fan or additional vents to prevent overheating.
7. Maintaining Your Greenhouse
Once your greenhouse is built, regular maintenance will keep it functioning optimally. Ensure that the plastic sheeting remains tight and replace it if it begins to degrade. Keep the greenhouse clean by removing debris and dead plants regularly. During the growing season, monitor the temperature and humidity to ensure your plants thrive.
8. Conclusion: Grow Year-Round with a Homemade Greenhouse
Building a homemade greenhouse is a rewarding project that allows you to grow plants throughout the year. Whether you use wood, PVC, or recycled materials, you can customize your greenhouse to fit your gardening needs and budget. With the steps above, you'll have a functional and budget-friendly greenhouse up and running in no time.